HOW TO SPEND EIGHT YEARS OF YOUR SPARE TIME CONSTRUCTIVELY (pun intended):

Myself, my wife and son, and Spanish Mediterranean style home that took us eight years to build.
THE BEGINNING
Building a home is no simple matter. First and foremost, it is hard work requiring long hours and just about every spare penny you can find. It requires a single-minded dedication to the task that many will never be able to muster.
Our home took eight years to build. Weekends, holidays and vacations... All were used up in the building process. Money for permits, tools, material... There was never enough.
When I started the place, I was single, had a decent 8-to-5 job which didn't pay much(not many jobs in Santa Fe did), and had just turned 31.
One fine Saturday afternoon, I went with two friends to a place called "The Turf Club" on the Albuquerque Highway south of Santa Fe for a couple of beers, and the new waitress - unbeknownst to her - instantly changed my life.
That evening, I went to my parents home and informed them that I had met the girl I was going to marry, and that we would need a place to live, so I intended to build a house. Since I couldn't afford a nice new place in one of Santa Fe's few subdivisions, I would build it myself.
For whatever reason, this did not seem unrealistic to them, so they decided to deed one acre to me on which to build the place. They wanted to meet the young lady right away, but I told them she was not, well... fully aware of my intentions at the time, and that it would be awhile before the "come meet my parents" occasion occured. That didn't seem to bother them much either.
I had been fiddling around with some house plans for a time, so I drew up a builders set of plans, took them down to the permit office and got my construction permit. In those days, it was that simple.
However, to get a permit to wire the place myself, I had to take and pass the State Electrician Journeyman's exam. I missed one question... I had been an Electronic Technician in the Navy. That made the test easy for me.
Three things we did not do ourselves:
-1) The gas line hookup. It was cheaper to have a professional do it.
-2) The final color coat of plaster. Since it took me weeks to put on the scratch coat and weeks more for the brown coat, we had professionals do the color coat all at once so there would be no variations in the color.
-3) The asphalt driveway and road.
Everything else we did, with a bit of help from friends and family when the hard stuff came around like the 7" x 14" x 25' roofing beam installations, concrete pours on foundations and floors, etc.
What is to follow on this blog is our photo record.
FIRST THINGS FIRST
Planning. Like they say, measure twice and cut once.
I decided to build a scale model of the original plans, 1/2" to the foot, primarily to see how the roof and its angles would best be framed out. This original plan had only two bedrooms, so I thought I'd better expand it to a four bedroom house.

THE FIRST FLOOR.
This floor had the living room, family room, library, kitchen, 3/4 downstairs bath, utility room and furnace room.

THE SECOND FLOOR
This floor had three bedrooms and a nursery (bedroom two). The bedroom two closet had a ladder and trap door going up to the bell tower. Since this was to be a Spanish Mediterranean style home, I thought a bell tower would look proper. All bedrooms, excluding the nursery, had porches with wrought-iron railings.

THE BASEMENT
This was a shelter, no question about it.
Concrete floor, concrete block walls, reinforced with rebar and durowall(horizontal rebar), filled with concrete, concrete ceiling, all electrical wiring done in conduit.
It had a drainage system for the shower, sink and toilet and a cess pool 16 feet underground.(Cess pools are now illegal)
There were six rooms:
-1) Multi-use
-2) Vault with steel door
-3) Pantry
-4) Storage
-5) Bathroom
-6) Mechanical
The mechanical room had a 250 gallon water storage tank, air inlet, filters and air pump, and an exhaust fan.
There was a 24" x 36" concrete block crawl tunnel exiting the mechanical room 30 feet out into the yard, ending in a small 4 x 4 x 5 underground concrete block structure with a steel manhole at ground level. It was built above the cess pool. (Used the same hole twice)
I say "was", because a later owner filled in the tunnel and its exit.

The circular staircase was poured concrete steps, enclosed in a concrete block structure with concrete ceiling, and had steel doors and frames at top and bottom.
THE FIRST YEAR
Believe it or not, the below photograph is the first photo taken of the place. For whatever reason, I had not even thought of keeping a photo record until a friend took this shot.

The slab has been poured, all under-slab plumbing had been completed, and the walls were on the way up. This first section would include the family room, utility room, 3/4 downstairs bath and the furnace room. I would use the family room as a bedroom/living room and the utility room as a dining/kitchen as soon as feasible.(rent goes to zero) The gal in the photo is the wife of the friend, not my future spouse, who was still in the dark.
The next photo shows the place as the first section block-laying was complete and the window and door lintels were poured. Reinforced concrete lintels here, no puny wood stuff. I had intended to live here forever. Silly me.

Next came the roof over the family room. The three front porch arches were started. You can see one of those 7" x 14" x 25' roof beams I had cut special by a lumber yard in Espanola. The house had a total of four of them.

The second floor framing and roofing is shown below. Note the second of those huge roof beams. You can see the leaves are starting to fall.

By the time of the first snow, I had tarpaper on the roofs, plastic over most of the windows, and the first of the hand-made double-paned windows was installed downstairs.

Not bad progress for one guy with an 8-to-5 job and the occasional help from a friend or two on the heavy stuff.
WINTER - THE WORK GOES ON
By now a construction power pole had been placed and I had some electricity for power tools and lighting. The rear window in the photo is covered with plastic, and that's an old-time kerosene stove I used for heat. It kept the downstairs snug and warm.

The block walls were sheetrocked on a grid of 2" x 2"s on 16" centers and stuffed with R 71/2 fiberglass insulation. The ceiling had R18 installed. Those 2" x 2"s on the inside of the block walls made it easy to install wiring. It was not necessary to chisel out the blocks for receptacle housings.
With power and heat available, the ducting system for the furnace is installed. Below shows the ducting above the utility room.

The below photo is of the 3/4 downstairs bath. The finished floor is of 6"x 6" quarry tile and the cabinets and countertop are all hand made. I had the tools by now, and the finished stuff was too expensive. You can barely see the edge of the shower on the right. The walls of the bathroom were plastered using Structolite. The stuff is really neat for interior walls and looks great. Its lightweight and dries fast. This - of course - means I now had plastering tools and had learned to use them.
This was the first room to be finished.

It was springtime by now, and my construction time was being seriously compromised with the activities of chasing down my future wife. Inconvenient, but after all, she was why I was building the place.
YEAR TWO
 Front porch arch work.
This year was devoted to getting the utility room converted into a useful but temporary kitchen, completing the installation of the furnace system, and getting the master bedroom and master bath upstairs operational.
After the plumbing was all finished, I installed an electric water heater, to be later replaced with a gas unit when the gas line was installed.
The walls and ceiling were mostly unfinished sheetrock, the floors were mostly still raw concrete covered with the occasional throw rug, but by the end of the summer, I had a livable place to be comfortable in.
And didn't owe a penny on anything.
I worked on the rear upper and lower porches, the lower porch having its own archway.

The foundation (2 cubic yards of concrete) and base for the family room fireplace is built.

A hole is busted out in the wall and the firebrick base is installed in preparation for the Heatalator fireplace unit.

The Heatalator unit has been installed and bricking it in has started. The young fellow in the picture mixed up and hauled the plaster and mortar I used for a few bucks each session he worked.

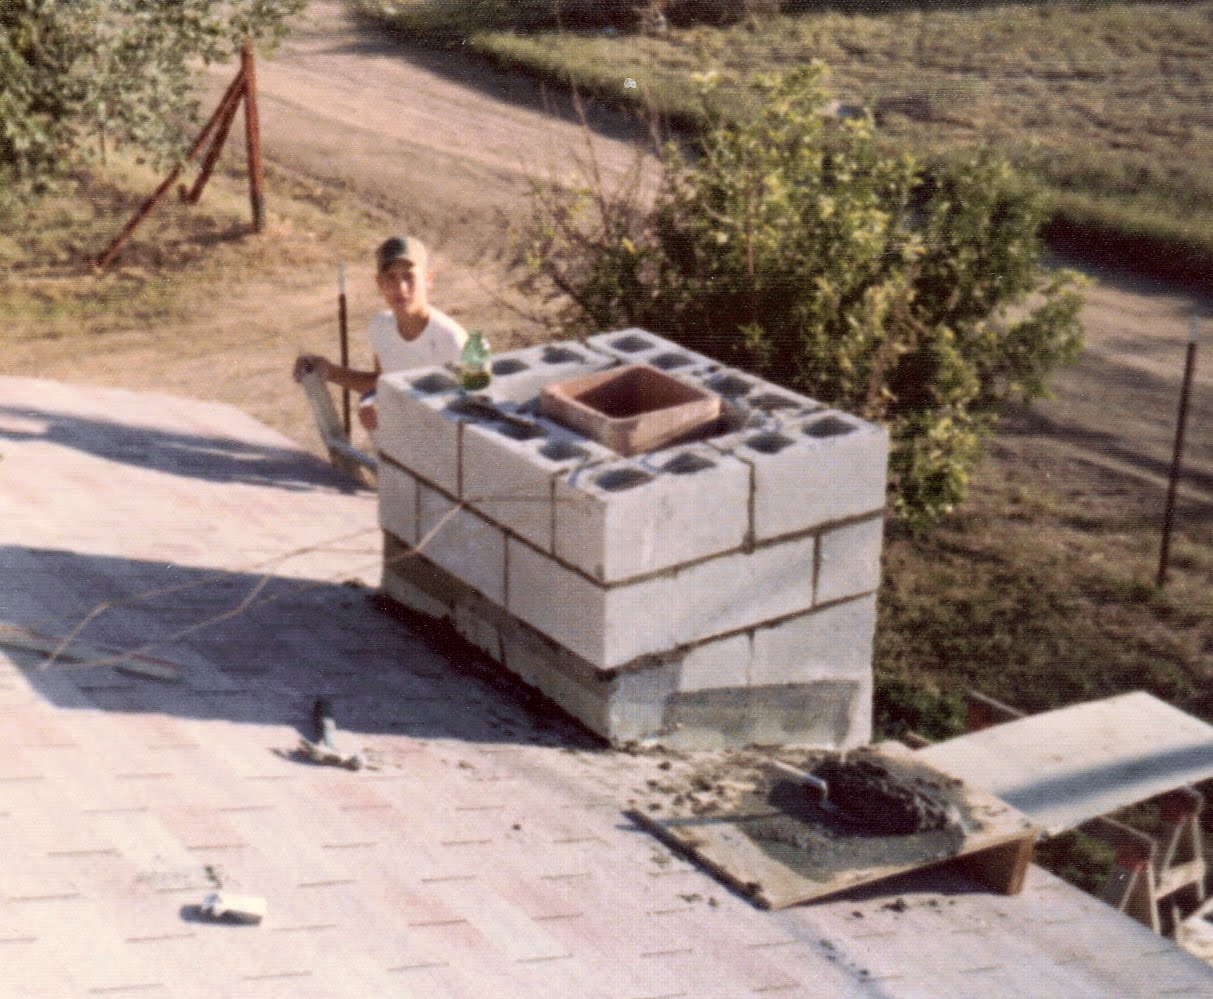
The flue and the brickwork(below) shoot up through the family room roof, which is now shingled in asphalt shingles. I add a shingling hammer to my collection of tools. The final quarry tile roof is still years away.

I finish the upstairs bath and master bedroom. Below is me doing the woodwork of the headboard for the bed. You can see my influence in decor, that's wood paneling and coach lamps. You can see the tops of those 8" woofers installed in the headboard.

The second year building season - summer and winter - was devoted to all those various projects to make the place livable and comfortable. To be that slim again...
The future wife project has progressed nicely... We are now seen everywhere together. She is still not yet aware(I think) that I'm building this home for her.
Of course, she may have been way ahead of me on all this...
 Front porch arch work.
This year was devoted to getting the utility room converted into a useful but temporary kitchen, completing the installation of the furnace system, and getting the master bedroom and master bath upstairs operational.
After the plumbing was all finished, I installed an electric water heater, to be later replaced with a gas unit when the gas line was installed.
The walls and ceiling were mostly unfinished sheetrock, the floors were mostly still raw concrete covered with the occasional throw rug, but by the end of the summer, I had a livable place to be comfortable in.
And didn't owe a penny on anything.
I worked on the rear upper and lower porches, the lower porch having its own archway.

The foundation (2 cubic yards of concrete) and base for the family room fireplace is built.

A hole is busted out in the wall and the firebrick base is installed in preparation for the Heatalator fireplace unit.

The Heatalator unit has been installed and bricking it in has started. The young fellow in the picture mixed up and hauled the plaster and mortar I used for a few bucks each session he worked.

The flue and the brickwork(below) shoot up through the family room roof, which is now shingled in asphalt shingles. I add a shingling hammer to my collection of tools. The final quarry tile roof is still years away.
I finish the upstairs bath and master bedroom. Below is me doing the woodwork of the headboard for the bed. You can see my influence in decor, that's wood paneling and coach lamps. You can see the tops of those 8" woofers installed in the headboard.

The second year building season - summer and winter - was devoted to all those various projects to make the place livable and comfortable. To be that slim again...
The future wife project has progressed nicely... We are now seen everywhere together. She is still not yet aware(I think) that I'm building this home for her.
Of course, she may have been way ahead of me on all this...
YEAR THREE
The time had arrived to start of the second half of the house. This meant that first, I had to get the basement done.
Digging the hole was the first chore. I got a friend with a back hoe to dig that thing (below) in one day! The white marks on the ground in the rear of the photo indicate where the exit tunnel and cess pool excavations were dug the next day.

Next came the first concrete pour(below). The black marks on the side of the dirt indicate where rebar was inserted into the concrete. That's my Dad on the left manhandling the jitterbug, my nephew Tom Buvinghausen, in the middle, and me with the screed on the right.

Blockwork on the first section of the basement. I can assure you that working below ground level is much harder and takes longer than one might think.

Blockwork on the second section (below).

The second of only three photos of me ever taken in eight years of building. I'm tamping down pea graveled concrete around the rebar in the blocks.

Supports for the basement ceiling/living room concrete floor pour being installed. Plastic sheeting is placed on the plywood, and a rebar array is being laid down. You can see the trench for the unfinished exit tunnel in the lower left of the photo. Vertical rebar is poking up everywhere. In the distance is the brand new wife wearing a carpenter's apron and little else... now helping do stuff. Her financial contribution to the construction fund from her job was a powerful aid in getting all this done in one season.

Finally... The big pour of the year is done. It has taken all summer to reach this point. That's wife's sealpoint Siamese testing the concrete. The various sized pipes sticking out here and there are for water and air to the mechanical room below.

Troweling and smoothing this pour took many hours and well into the night. Below is Jan working the last corner of the job. It was late fall, and it got chilly at night.

Below is the forest of supports holding up the ceiling pour. I left them in for a month before removing them. I was in no rush to see all that concrete come crashing down.

But no rest was in sight. The autumn weather was holding great so we continued onward.
YEAR THREE ADDITIONAL
Just after finishing the basement, Dad decided to pave the 365 foot dirt road from Airport Road to his house. My place was about halfway down that road on the east side.
That gave me the opportunity to have my driveway paved, so I rushed the sidewalks, edging and prepared the area - leveling, etc. It was unexpected and altered the construction schedule somewhat, but what a marvelous thing it was to no longer have to slide down that muddy dirt road after a rain, and have a mudhole for a front yard. There were times when it rained so heavy we actually got the cars stuck in the yard.
In the below photo you can just barely see the 1 foot-wide concrete edging I installed to define the pavement area. Its just below and to the left of the left tire of this roller.


One of the later owners had the pavement removed and started using the dirt road on the east side of the house for access. As I understand it, they wanted a hacienda-style patio where the pavement was.
I assume they then learned about the area's clay rich surface that made up the local dirt roads, stuff that turned into pure grease when wet.
YEAR FOUR
 The basement tunnel exit, the 4' x 4'x 5' space before its concrete roof was poured and the steel manhole installed.Always a good idea to have a back way out.
This year the entire house finally got all the walls and roofs completed, including the scratch and brown coats of plaster. some interior work was done, generally when the weather outside prevented any exterior work.
Below shows the framing and roof work for bedrooms three and four, the ones that went through the winter exposed to the weather. You can just make out the last of the 7" x 14" roofing beams.

Jan quickly learned many aspects of construction. She had learned to trowel concrete. She could tape and texture sheetrock. She learned to swing a 16 oz. hammer with the best of them. The photo below shows her nailing down the second floor sub-flooring over the kitchen-living room area.

Below is some of the interior work. This shows the framing and sheetrocking of the furnace vents in the utility room.

I built the cabinets out of plywood and 1" x 2" lumber, and even sheetrocked and textured the sides. During this time, this room was used as the temporary kitchen.
The fireplace was a very popular spot. Below is wife doing a bit of knitting all snuggled up to the thing. The hearth had not yet been dressed up with quarry tile... Like the tile on the bathroom floor.

Below shows me installing the flue opening for a "Fire Duke" in the upstairs master bedroom. It was not in the original plans, but the downstairs unit was so pleasing we decided to install this one also.

Below is Jan grouting the 6" quarry tile installed on the fire Duke's corner pedestal in the master bedroom. We never once used it, even after all that work.

Wouldn't you know it? Before I could even get the place finished a water pipe started leaking. It took a lot of digging, the pipes were four feet down.

The photo below shows a lot of details of the house. The first floor was pumice block, the second floor framing. The downstairs windows were all hand made from 1" x 4" framing with 8" x 10" panes of glass, and were all double paned. They took so long to build we decided to use aluminium frame windows for the upstairs. I rented two sections of scaffold to work on the upstairs outside to put on the tar paper, chicken wire, and then the scratch and brown coats of plaster.
All those 2" x 10"'s and that horizontal run of 2" x 4"'s? Those were for the future rear porch's ceiling and roof to tie into. It was to be like the front porch, only with seven arches.

Even with the rented scaffold, I still had to use a couple of 2" x 12"s and a picnic table bench to reach up in the peaks.
The below shot shows the entire place just before I started all that plastering.

The Bell tower lasted until it was time to plaster it. I decided that working thirty feet in the air on my rickety scaffolding wasn't worth the risk, so down it came.
After what seemed like forever, the plastering was finished. The plaster on the upstairs had more lime in the mix to make it adhere better to the chicken wire, that's why it's lighter in color. Shortly after this photo was taken, the bell tower was removed. Sorta sad, I still think it would had looked real cool.

Note that the library door has been blocked off and sealed. The place already had more than enough exterior doors.
YEAR FIVE
The really expensive work started now. All the interior first floor walls got their 2" x 2" grid on 16" centers for the R7 1/2 insulation and sheetrocking. there was finish and trim lumber - expensive - all manner of kitchen equipment, the MB carpeting, all those pricey little do-dads that finish off a home.
At this point in time the only three totally finished rooms were the master bedroom, master bath and the downstairs 3/4 bath. I had decided to finish the master bedroom and bath because we really needed a place to escape all the sheetrock, fiberglass, concrete floors, the tools and material scattered everywhere.
The kitchen area was where all my power tools were: 10" table saw, 10" radial saw, 6" planer, 6" belt sander, router table and floor stand drill press. I also had the standard bunch of powered hand tools... Drills, saws, etc. Out in the yard was a 3 cubic foot electric concrete mixer used for mixing up all the pea graveled concrete used to fill the pumice block hollows where vertical rebar had been inserted.
By now I was working at the Los Alamos Scientific Laboratory at the Meson Physics facility. It was a forty-mile drive each way, so for the most part, I left the house before daybreak and got home close to dark. Unfortunately, this meant I took a lot fewer pictures, so the remaining work is not very well documented.
Our son Tom had been born year four and was now able to observe construction. Below he is checking out the tile floor installation in his nursery (bedroom two)

And here he is, learning to play Hearts at a young and tender age. Wife and son are sitting at our second-hand table in the temporary kitchen.

Having a good job at LASL (now LANL) allowed us to borrow some money against the house to pay for the final color coat of plaster on the entire house. I had professionals do this, I would have taken way to long. The borrowed money also allowed us to purchase all the kitchen and utility room equipment all at once and install them quickly.
We had the bank-required appraisal done before the loan and were a bit shocked to discover the value of the place, even unfinished. We had been keeping a running total of the cost of all the materials but had not included labor, the number one expense in home construction.
The exterior and the left half of the interior is now pretty much finished, But inside, plenty of unfinished rooms were left... the living room, library, kitchen, bedrooms three and four, the second upstairs bathroom.
Still in the plans was a two-car garage, workshop and storage.. Those were never started.

The best laid plans... etc. etc.


ACROSS THE FINISH LINE
The final three years were spent finishing everything. Plastering, painting, finish trim, tile and carpet laying.
During this time, photos showing the house generally had a family member in it.
Below is son Tom putting out cookies and Milk for Santa. You can see the family room has been paneled and carpeted, but the hearth is still untiled. Tiling that hearth was just about the last thing I ever did in the place.

The following is Jan all dressed up for our long-awaited housewarming party. She is sitting in the finished living room.

During this period of time, I also built our first storage shed building. We were counting on the income from the completed storage shed complex to help keep us afloat in our later years. the below plan is what we had intended to eventually build.

Building one was the only one ever finished. I had enlisted help from Santa Fe's NMRA sanctioned Model Railroad Club to get the place up fast. I gave them a 20' x 20' space for them to build their model railroad layout in, and with their help, the place was finished in less than four months.
Below is the floorplan of building one with the 400 sq.ft. space for the railroad club.

The other three buildings would be identical except they would not have the large space.
I have lots of photos of this project. Following are a few of them.
 Trainclub members doing some of the hard work
 Wife Jan installing door latches and my Dad in the rear eyeballing progress.
 A Joyous me as I finished the last of the plastering in the club room.
All the train club members - and myself - had regular 8-to-5 day jobs. We built this place in the evenings and on weekends.
EPILOGUE
You may wonder why we left, after having spent eight years building what some would consider a fantastic home. We were working on our storage shed facility which was 25% completed and had opened up a Saw-Sharpening shop that employed three-part time workers. The shop was full of Foley and Belsaw equipment, which made the work easy and professional.

I had maintained my Dad's Sewing Machine Repair business by handling repair calls from the Santa Fe/Los Alamos area, and had a good job with great retirement possibilities at the Los Alamos Scientific Laboratory.
No doubt I had a full plate, but being in my 30's and having the ability to handle all the varied chores, there was nothing in our private or business lives that was causing any grief or discontent. True, I had to hire and train three people to handle the saw business, but I chose two guys and one gal who already had good 8-to-5 jobs but wanted some extra cash for evening or weekend work. They did good work and were quite reliable.
Who would willingly walk away from that?
I have removed this section of text.
.
It was then that we decided to put everything up for sale and leave.
And we did exactly that.